Welcome to the "Take Charge of Your Home" series from Direct Energy! Hiring a professional to perform household maintenance may offer convenience and peace of mind, but you can do many of these jobs yourself with no experience or special tools. And in the process, you’ll save money, learn about how your home works and gain a sense of accomplishment from a DIY task done well!
Your water heater is one of those appliances that is easy to take for granted. It’s out of sight, out of mind, and can do its job for years on end without any maintenance at all. You might only think of it when something goes wrong. However, like most appliances, water heaters require periodic maintenance in order to maximize energy-efficiency and extend the lifespan of the unit. A neglected water heater may keep hot water flowing for a few years, but will gradually cause your utility bills to creep higher and eventually it will fail altogether. The best way to protect your investment is to have your water heater serviced annually by a licensed plumber. A good plumber will conduct a full inspection for rust, leaks and other problems, test the thermostat and valves, replace the anode rod to prevent corrosion and flush the tank. But that last task -- flushing the tank -- is one you may want to perform yourself as often as every few months, depending on the mineral content of your local water supply. Learning how to flush a water heater on your own can save you a lot of money over time.
Should I Drain My Water Heater Periodically?
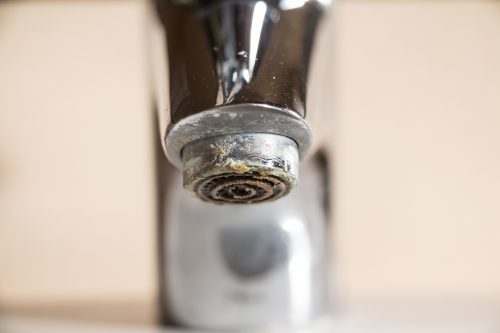
Periodically flushing out the lime and other sediments in the water heater tank improves the heater’s efficiency and lifespan. In neglected water heaters, sediment can accumulate and calcify, making it difficult to remove. This can get so bad that the entire unit may need to be replaced. But if you flush your tank regularly, you can prevent sediment from causing problems. All water has some degree of mineral content. If you live in an area with lots of limestone beneath the ground, the groundwater will pick up calcium and magnesium deposits, resulting in “hard” water. Hard water creates sediment in the form of lime scale that settles out of the water and builds up at the bottom of your water heater. With natural gas heaters, it can cause uneven heating on the tank that eventually causes leaks. With electric heaters, scaling can burn out the lower heating element. And in both, sediment buildup can clog the drain valve.When Do I Want to Flush My Hot Water Heater?
Most homeowners should flush their water heaters every six months or so, but if you have extremely hard water, you may want to do it more often. Flushing your hot water heater could be necessary as often as every few months depending on the mineral content of your local water supply.Before You Begin a Water Heater Flush
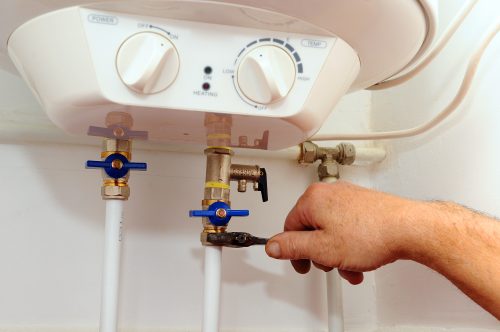
Prior to draining the tank, you need to figure out how to turn off your gas water heater. A vacation setting might do the trick. You should also find out whether its pilot light must be lit manually. The best source for this information is the original owner’s manual, because pilot lighting procedures vary among models. If you don’t have a manual, check the water heater’s label for a brand name and model number and try to look up the manual online. There may also be pilot lighting instructions printed on a label on the tank.
How to Flush Your Water Heater
Once you’ve figure out your specifications, it’s time to conduct the flush:- Step 1: Turn off the cold water supply to your water heater. In older homes, you may need to turn off the water where the main water supply line enters your house. If you have a water softener between your main supply line and the water, there should also be a supply shut-off valve there.
- Step 2: Turn off or turn down the water heater thermostat. Some water heaters have a “vacation” mode. The goal is to avoid having the heater turn on once all the water is drained out, especially for natural gas heaters, because heating it without water can damage the tank. You should also close the gas supply valve before continuing.
- Step 3: Connect a garden hose to the tank’s drain valve near the bottom of the heater. The other end of the hose should lead to a drain or somewhere safe outside. If you’re letting the water drain outside, make sure it’s far enough from your foundation so it doesn’t flow into your home’s crawl space, and keep it away from shrubs or other plantings. If you’d prefer to not deal with hot water at all, turn off the water heater at the end of the day to let it cool overnight before you drain it, or just run your hot water tap for several minutes before you get started.
- Step 4: Open all the hot water faucets. This will let the water drain from the tank faster. It’s the same effect as putting your finger tip on a soda straw and then lifting the straw out of a drink. Vacuum keeps the liquid trapped inside until you lift your finger.
- Step 5: Open the water heater’s drain valve and let the tank drain. Be sure to check on the water as it flows out of the hose to keep an eye on how much sediment is coming Also, make sure the water is going where you want it and keep away any small children or curious pets that get too close.If you open the drain valve and no water flows, it’s possible that sediment has clogged the valve and you’ll need to open the temperature pressure release to let off pressure from the tank and drain any water that’s left in the hot water pipes downstream from the heater. Next, use a wet/dry vacuum to suck some of the blockage out of the drain valve —at least enough to get the water flowing. Wear gloves and be careful to avoid getting splashed with hot water. If the blockage is bad enough that it won’t budge, remove the temperature pressure release valve and suck out the water with the wet/dry vac before you replace the drain valve.
- Step 6: After the tank is drained, turn the cold water supply back on, which will help rinse out any sediment left in the bottom of the tank. Let it run for a few minutes and check the end of the hose to see when it runs clear, then turn it off. If you’re not sure, collect a glass of water from the drain hose after about a minute of flushing, then shut off the water supply. Wait a few minutes to see if sediment begins settling at the bottom of the glass, and if so, or if the water is tinted, flush some more.
- Step 7: Disconnect the hose from the drain valve and use a wet/dry vacuum to suck out any sediment from the opening. This will prevent it from fouling the valve when you shut it off. A little won’t do much harm but you want to clear enough out so that the valve doesn’t leak. Once you’ve closed the drain valve, turn the cold water supply back on.
- Step 8: Leave the hot water faucets open until water begins flowing out of them. This will prevent air from becoming trapped. Don’t be surprised if you see rust or sediment coming out at first. Once the water clears, usually after a minute or so, it will be ok to turn the faucets off.
- Step 9: Reset the water heater thermostat to your preferred setting. If you have a gas water heater, reopen the gas supply valve and relight the pilot using the process recommended by the manufacturer. Once the tank is filled, you should have plenty of hot water in 15 to 20 minutes, though exact timings depends on the size of your water heater, its overall efficiency and whether it’s natural gas or electric.