Whether it happens in your ceiling because of a leaky roof, condensation from your central air conditioning, or flooding, repairing water-damaged drywall can cause you anxiety and aggravation, especially if you’ve never done it before. After all, the ceilings and walls in your home are supposed to be solid and sturdy, and tearing a hole into one should be really complicated. It’s actually far from it. True, the process will take some prep work and make a bit of a mess, but with a little patience and care you can make the damage practically invisible in just a few days.
Drywall is actually a panel of gypsum (calcium sulfate dihydrate) that is sandwiched between two types of paper (one is a light-colored facer, the other the darker backer). It was first became available in the U.S. in 1916 when United States Gypsum Corporation put out a product called “Sheetrock” meant to be a non-warping, non-burning wall covering. Because it went up quickly without the need for wooden lathe, the product was billed as “the poor man’s answer to plaster walls.” By the 1950s and 60s, drywall had become a standard construction material.
Most interior drywall is ½ inch thick for walls. The same thickness is used for ceilings, but ¾ inch is not uncommon where the design called for more rigidity. For arches and curves, ¼ inch is used. While it comes in 4’ x 8’ sheets, many home centers do stock smaller pieces and some will even cut pieces to size for you for a price.
Determining Water Damage to Drywall
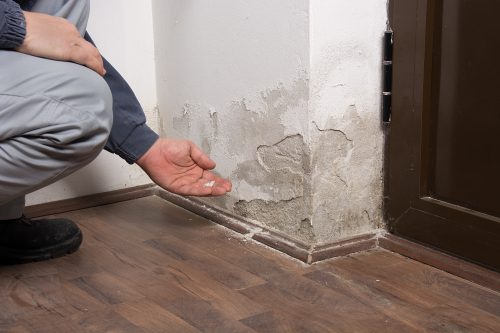
Because the gypsum drywall is porous and soluble in water, getting it wet can turn into a major headache. Wet drywall will absorb water and grow heavy to pull off from screw or nails that hold it in place. In the case where drywall does get wet and just begins to sag before drying out, fixing it might just require pushing it back into place, securing it with some new screws, and then painting over it with some stain-killing paint.
However, if the drywall gets soft and smushy, then it’s very likely the gypsum will crumble and the paper will separate when the area dries. In that case, you’ll need to cut out these water-damaged sections as soon as possible. When assessing how to repair ceiling drywall when it’s wet and sagging, it’s possible that it could have water ponding above you. To drain it in a controlled fashion, poke a hole through it with a nail to let the water drain out. Place a bucket underneath to catch the water.
Wet drywall can absorb water, so it’s also a magnet for mold. The moisture makes a perfect environment, and mold spores feast on the paper. So whether you’re cleaning up from a leak in your attic or a flood, you need to repair water damaged drywall as soon as possible. You also want to make sure that the damaged area is thoroughly dry before you begin patching and repairing.
Because mold and mildew can be a serious health hazard, it’s not unusual in cases when flooding is less than 12 inches to remove up to 18 inches of drywall. However, FEMA recommends that if the water level was less than 2 ½ feet, the wall material should be removed to a height of 4 feet. As drywall comes in 4’ x 8’ sheets, this makes it easier to replace the damage with full sheets. If the water level was greater than 2 ½ feet, the wall material should be removed to a height of 8 feet or up to the ceiling joint, whichever is higher.

How to Repair Water Damaged Drywall
Cut Out the Damaged Sections
When you’re removing the damaged area, it’s a good idea to cut it out as a rectangle or square. While this usually increases the amount of area you need to replace, this makes it easier to cut and fit patches. It also makes the mudding and taping work easier to blend in with the rest of the area. For ceilings, patches that are 12 square inches or less can be held in place with drywall clips. Anything larger should be attached to the ceiling joists in order to securely hold the patch’s weight as well as any insulation above it.
Use a drywall or keyhole saw to cut out the drywall you want to remove. Be on the lookout for wires and plumbing as you go. Take your time.
Measure & Install Replacement Pieces
After removing the damaged drywall, measure the size of the hole so you can cut out a patch from a new sheet of drywall. Place four drywall clips around the hole. Secure each one in place with a drywall screw, making sure to countersink the screw head. Be careful not to overdrive the screw. Cut out the patch and insert it, then secure it to the drywall clips (and available ceiling joists) using drywall screws. Be careful not to over-tighten.
If you are replacing large sections of drywall damaged in flooding, you’ll need to measure and cut out any openings for outlets before you attach the panel to the wall.
When you are planning large repairs, remember that drywall comes with a bound edge and a butt edge. The bound or long edge is thinner than the rest of the sheet. By reducing the thickness here, it’s easier to hide long taped seams under several coats of joint compound. The butt edges at either end of the sheet are as thick as the rest of the sheet. In order to get an even, finished look, it’s important to avoid joining bound edges to butt edges. Also remember that since wall studs are vertical, drywall is normally attached so that the longer side runs horizontal (perpendicular) to the studs. This helps reinforce the strength of the wall and helps break up vertical seams in the drywall that tend to be more noticeable even when the job is finished.
Blend the Seams & Paint
Tape over the seams with either mesh tape or paper tape. Though mesh tape seems to be more convenient because it is self-adhesive, many professional drywall installers prefer paper tape. While I’m not a professional, I prefer paper tape, too. However, paper tape isn’t always convenient. Using paper tape requires some practice and little finesse, but it’s well worth learning.
Apply the first coat of joint compound or “mud.” The secret behind mudding is to cover the joint and use the mud to blend in the repair with the rest of the wall. Spread the mud out 4 to 6 inches from the edge of the repair. Let this coat dry thoroughly for 12 to 24 hours then sand off any ridges. Be sure to wear a dust mask.
Vacuum or wipe off any remaining dust and apply the second coat. Let dry and sand. Remember, the entire process can take a few days, so be patient.
Dried joint compound absorbs a lot of moisture. The repair will need to be painted with primer to help seal the area before painting.