Welcome to the Take Charge of Your Home series from Direct Energy! Hiring a professional to perform household maintenance may offer convenience and peace of mind. You can do many of these jobs yourself with no experience or special tools. In the process, you’ll save money, learn about how your home works and gain a sense of accomplishment. A DIY task done well!
Unless you live in one of the southernmost regions of America, chances are there’s no need to irrigate your lawn in the winter. But simply shutting down your sprinkler system isn’t enough -- you must also completely drain the water from the system to prevent it from freezing, expanding and cracking your underground pipes. Learning how to protect a sprinkler system from freezing isn’t rocket science, but it’s still worth thinking twice about whether to do it yourself.
Consider Hiring a Winterization Pro
Lawn sprinkler winterization can be a relatively quick DIY job, but there are a few reasons why you may still want to spend the money to hire an irrigation maintenance professional for this one. First, the winterization process requires a fairly comprehensive working knowledge of your specific system, including the layout of each irrigation zone. If you don’t know your system well, it’s good to have a trained eye looking over the process.
Second, the blow-out process (which most systems will require) can cause damage to system components if it’s not performed properly. And finally, blowing out a sprinkler system requires a fairly powerful air compressor, which most homeowners don’t have in their garages. These can be rented (a 10 cubic-feet-per-minute model is recommended), but if you’re already going to that expense, you might be able to hire a pro for not much more.
Draining Sprinklers on a Slope
Not all systems need to have the water blown out of them. You can winterize a sprinkler system without an air compressor if all of your irrigation lines are buried at a slight downhill slope. Simply shut off the main water supply to your system and open the drain valves at the end of each zone. Once all of the water has trickled out, replace the caps and open the stop and waste valve and the valves on the backflow device to drain the remaining water.Automatic Sprinkler Draining
If you have a high-end sprinkler system with integrated pumps for automatic draining, you should follow the specific instructions for your system as indicated in the operating manual. This process can usually be initiated from the control panel.How to Winterize Your Sprinkler System: Blowout Method
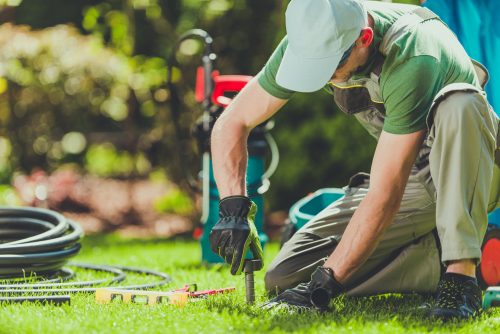
If you decide to forge ahead on your own with the blow-out method, you’ll need to gather a few supplies:- Air compressor, as mentioned above, preferably a 10 cubic-feet-per-minute model.
- Quick connect hose adapter that can connect the compressor hose to the blow-out port on your sprinkler system.
- Walkie talkies or phones. You may also need a helper if you can’t see your entire sprinkler system from the location of the blow-out port, because it’s important to shut off the air compressor as soon as all the water has been blown out. This may mean you need a pair of walkie talkies or cell phones to communicate.
- Eye protection. Everyone involved in the process should have eye protection.
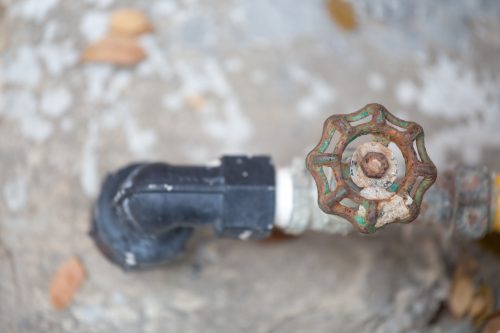
Begin by closing the main supply valve as well as the valves on either side of your system’s backflow device, which will protect it from damage caused by the compressed air. Make sure your air compressor hose valve is closed, then remove the cap on the blow-out port and use your quick connect adapter to connect the compressor hose to the port.
Next, adjust the pressure gauge on the air compressor to 80 psi if you have a PVC pipe system, or 50 psi if you have a polyethylene pipe system. Exceeding these maximums could cause your pipes to crack.
You’re now ready to blow out the pipes zone by zone. Start with the zone farthest away and open the drain valve at the end of the line. Use the control panel to open that zone only and put on your eye protection. This goes for your spotter, too, if you have one -- just in case you accidentally pressurize the line too much and pop off one or more sprinkler heads.
Slowly open the air compressor valve to begin blowing air into the system. You or your spotter should see water coming from the zone’s drain valve, if not the sprinkler heads themselves. As soon as the water stops flowing, close the compressor valve. Failure to do so can cause your sprinkler head gears to spin so fast they could melt. When all the water is out of the line, close the drain valve at the end of the zone and move on to the next closest zone.
After you’ve purged every zone, open the backflow device valves and the stop and waste valve to drain whatever water remains between your main valve and the backflow device. The system should be dry now, but you’re not quite finished.
Protect Your Sprinkler System for Winter
There are a few more components of your system that may need protecting, most notably your main valve. There’s water sitting right behind it, and some of it is probably in a small section of pipe that is exposed to the elements. Wrap this length of pipe in insulating foam and secure it with zip ties, then tie a plastic bag over the entire valve. This will help prevent it from freezing in low winter temperatures.
If your system is equipped with a removable pump, it’s also best to completely disconnect the pump and bring it inside for the winter. The pump may be located under a cover in an underground pit. If there’s a fully integrated pump, cover it with a plastic bag or insulating blanket.
Finally, shut down your control panel for winter. You can disconnect the power source completely or, if your system has a winter or shut-down mode, switch it to that setting. Consult your control panel user guide if you’re not sure.
That’s all there is to it! Stay warm for the next few months, and before you know it, it will be time to learn how to de-winterize irrigation system equipment for spring.